Key to Vex Thal
Overview[edit]
This is going to be a fast and dirty guide specific to TAKP on getting your VT key. There will be overlap with other guides of course, but there might be some specific details that pertain to TAKP in particular that you may not find elsewhere. There will be no quest dialog here, as you don't need any faction work or dialog following to hand in everything you need to get the key. If you want more detail on the dialog and quests, links to each of the keys is provided to Allakhazam's at the bottom.
Overall, you need the following to get your VT key:
- Obtain key to Emperor Ssraeshza's chambers (Ring of the Shissar).
- Loot 10 Lucid Shards (Lore/Nodrop), each from different zones across Luclin.
- Acquire Shadowed Scepter Frame in Akheva Ruins. Combine all 10 shards in it to receive an Unadorned Scepter of Shadows.
- Loot A Planes Rift after killing Emperor Ssraeshza (requires the Ring of Shissar key).
- Loot A Glowing Orb of Luclinite from any Luclin raid mob.
- Combine the A Glowing Orb of Luclinite and the A Planes Rift in the Unadorned Scepter of Shadows.
You can of course farm the Luclinite, shards, and frame before killing the Emperor or even starting the key to his chambers.
Key to Emperor Ssraeshza's chambers (Ring of the Shissar)[edit]
Key to Emperor Ssraeshza's chambers (Ring of the Shissar) requires the following drops from within Ssraeshza Temple:
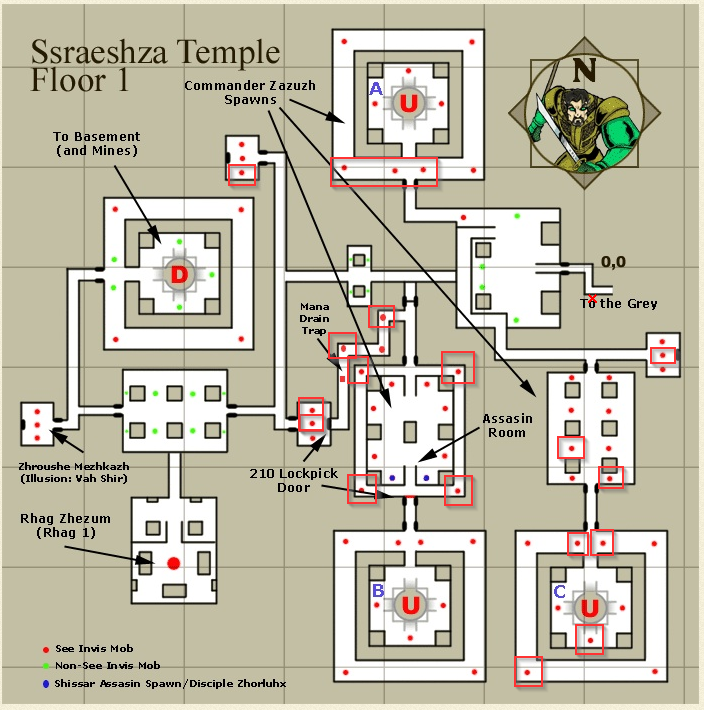
- Zazuzh's Idol drops every time from uncommon spawn of Commander Zazuzh (slowable) on the first floor of Ssraeshza Temple, most (not all) spawn points that can spawn "an elite temple guard" on floor 1 can spawn a Com 1. Group/3 boxable. Map marked from database spawnpoint data is here: Commander Zazuzh's spawnpoints. Only one Commander Zazuzh can be up at a time, 5% chance to spawn with 20 minute respawn.
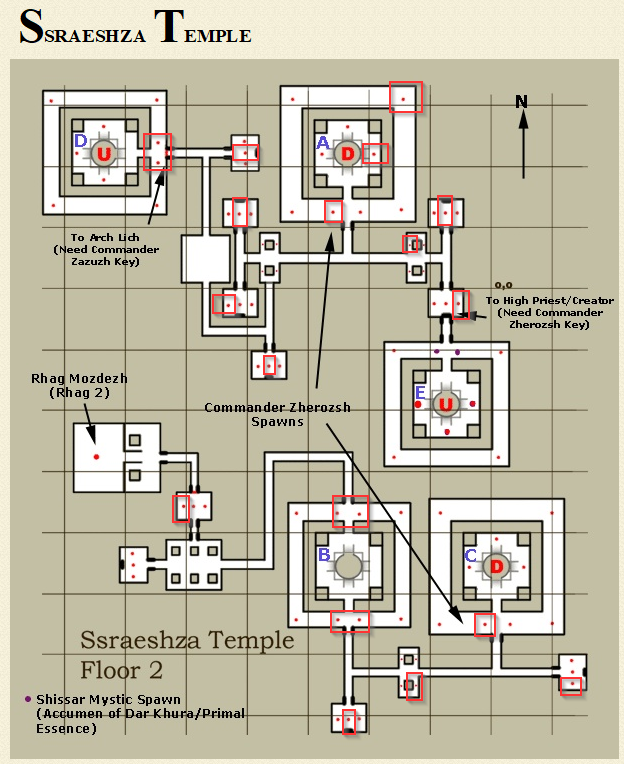
- Zeruzsh's Ring drops every time from uncommon spawn of Commander Zherozsh (slowable) on the second floor of Ssraeshza Temple, most (not all) spawn points that can spawn "an elite temple guard" (not slowable) on floor 2 can spawn a Com 2. Group/3 boxable. Map marked from database spawnpoint data is here: Commander Zherozsh's spawnpoints. Only one Commander Zherozsh can be up at a time, 5% chance to spawn.
- Ssraeshzian Insignia drops every time from one of three specific named snakes on the second floor of Ssraeshza Temple. The three named are: Arbiter Korazhk (can gate/CH, easiest of the insignia mobs), General Kizuhx (slowable, rampages), and Advisor Zekuzh (gfluxes). Raid recommended due to amount of hit points and time it takes to kill them. Only one of each can be up at a time, 20 minute respawn.
- Combine the above three in a Taskmaster's Pouch, an uncommon drop (25%) from Taskmasters and Warden in the basement of Ssraeshza Temple. Respawn on Taskmasters/Warden is 2 hours. Before killing Taskmasters, verify with the guild in question that it won't mess up their Cursed cycle rotation schedule.
- The Taskmasters are:
- - Taskmaster Kavamezh - unslowable, flurries
- - Taskmaster Keuzozh - unslowable, flurries
- - Taskmaster Mikazha - slowable, gates
- - Taskmaster Revan`Kezh - slowable, rampages
- - Taskmaster Vezhkah - slowable, flurries, gates
- - Taskmaster Zerumaz - unslowable, flurries
- - Taskmaster Zhe`Vozh - slowable
- - Warden Mekuzh - unslowable, gates
- The Taskmasters are:
Acquiring the Shards[edit]
These are listed in Zone order of the zones, not order of difficulty so tread carefully. You can use the identify spell to check which shard is which, view your inventory from the TAKP Game Accounts, or link them into Alliance chat and check them in the Discord channel.

Acrylia Caverns[edit]
Ved - #8 on map is the camp spot for shards in this zone. There are only two mobs that drop these shards standing on each side of the gate, a runed grimling (15% drop rate) and a grimling skullcracker (5% drop rate) with a 20 minute respawn. The runed grimlings are near magic immune and you won't be able to snare them, and of course they run. So some thought may need to be put into this depending on your classes. Mezz the other and kill the runed first, kill them both equally fast if both runed, etc. Plan accordingly. Other grimlings are listed as dropping the shard, but are all within the keyed inner Acrylia.
Akheva Ruins[edit]
Dax - Of the three shard dropping mobs, the Shaded Stones are the mobs you want to kill. While they all have a 6% drop rate, avoid the Rubble Rousers if possible as they have a massive amount of HP (100K!). The SW corner around 0, +100 is a decent place to setup camp. You can usually invis right to this spot. Pull from the room to the west.
Dawnshroud Peaks[edit]
Lor - #3 on the map in the NE is inhabited by Rockhoppers who have only a 2% drop rate for shards. Avoid killing the "An Age Old Rockhopper", it will switch the caves to Sambata tribesman instead of Rockhoppers and you'll make the tailors of the server grumpy (and the Sambata Tribal Hunters only have a 1% drop rate...).
The Deep[edit]
Raf - This zone is not for the faint of heart. There is a camp labeled #1 on the map that is relatively safe (one roamer that sometimes sees invis). Shard drops here may be slow however. YMMV of course. Sometimes you can invis to this camp, but often, you cannot. Just con everything along the way. Most of the time there is enough space inbetween bunches of mobs that you can break invis and they won't aggro. So, you can try pacifying at certain spots when you find a see invis mob, then invising and sending in each of your characters one at a time. Of course, a larger number of mobs dropping shards are across the invisible bridge. I typically cross (fear the shroom at #2 across the bridge) the bridge and head north, clear/invis through the shrooms and a couple other bunches of mobs. You will find green meanies pretty quickly. All of these have a 5% chance to drop the shard. Head west past the first T and then follow that south when it curves. These are all potential shard droppers. A word of warning, all of them will run at low hp and tend to be resistant to magic. It will usually take a few casts to get them snared unless you have magic debuff on them. If you clear all the way down to #4 on the map, you will likely see shards starting to rot by then. Bear in mind, you cannot coth in this zone and you cannot summon corpses anywhere except to the zone in.
Fungus Grove[edit]
Dat - Shards have a 5% drop rate here from Shik'nar Warriors and Royal Guards from the area designated 'Throne room' on the map. Only the Warlord Tk`kik`tthik (24hr respawn) between the two warriors, the two hall roamers, or the priest should add if you pull carefully, including the Royal Guards from the backroom. The Priest and the Soldiers are faster respawns than the Warriors, so keep them down and you shouldn't have problems. Be aware, if you charm pet the priest it will cast annul magic on occasion.
The Grey[edit]
Kel - Shards drop from Sun Revenants at the pond in the NW of the zone marked as #1 on the map. There is a path to the pond from the western wall where no ground traps spawn. The mobs also are all single pulls and have 6% shard drop rate. They are pretty resistant to everything but Magic. Ensure you have EB items, this can be a long boring camp and likely you will forget to recast EB when you afk at some point.
Maiden's Eye[edit]
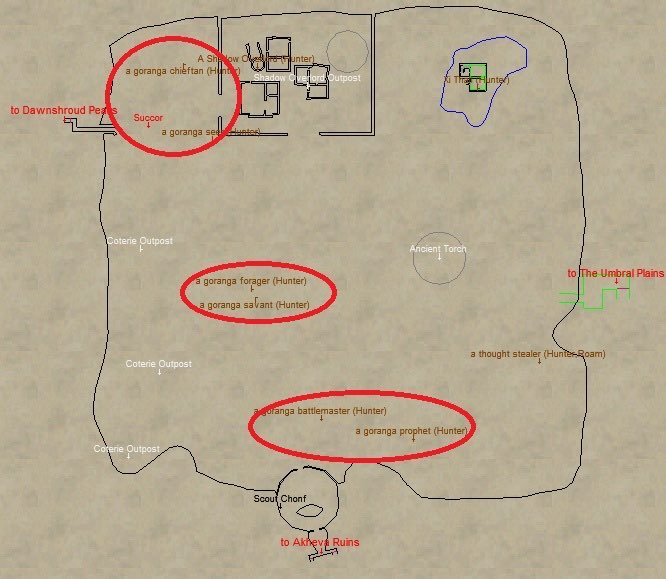
Tak - There are five named goranga that can drop this shard: a goranga battlemaster (85%), a goranga forager (100%), a goranga prophet (85%), a goranga savant (90%), and a goranga seer (85%). They are a 26 min respawn (a goranga scout is the only PH), with a 10% spawn chance. The Prophet and the Battlemaster are likely the easiest camps. There are two Goranga in front of AR near a rock. The right one, when facing out from AR, is the placeholder for the Battlemaster. Just to the east of the AR zoneline is a small hill. Over that hill there are three Goranga. The one nearest to the tree on the east side is the placeholder for the Prophet. Here is a map of all of them: Maidens Eye Shard Placeholders
Scarlet Desert[edit]
Set - Sun revanants and sun reavers at #3 on the map drop the shard in this zone 5% of the time. This is one of the easiest camps for shards. It is typical however to get multiple mobs with each pull. They are undead and very magic resistant. It is typical to get one shard every two to three clears.
Ssraeshza Temple[edit]
Vin - Certain undead in the mines of the basement in Ssraeshza Temple with a 7% chance. You have to go a bit deep into the mines. Nothing in the mines sees through IVU. Typically, around -950, -200 along the wall is a pretty good spot to set up and kill the undead nearby and clear to the east. Random mobs will HT you, so avoid pulling multiples when possible.
Katta Castellum or Sanctus Seru[edit]
Kelera - The last shard on this list can be looted in either Katta Castellum or Sanctus Seru. I found this shard to be much easier to get in Katta, but the drop rate is 5% at either. If you arrive from Twilight Sea, Evac once you zone into Katta (since running all of that is annoying). Set up camp to hunt Centurions in the open area north of the #2 building on the map. I would typically pull singles or doubles from outside and inside the building to this NW corner. Any Centurion has the ability to drop the shard (day or night). They summon, and some mobs will be SoWed, so be aware. The Centurions are on a day/night cycle, so don't be surprised by the despawn/repop. For Sanctus Seru, you want to zone click the portal at #1 to get up to the observation deck and clear in one direction. It will loop back around. Typically you will see a shard in a clear around or so. Bear in mind that agro ranges are large in Seru, you will easily get 2+ mobs with every pull, so some form of crowd control is recommended.
Acquire Shadowed Scepter Frame[edit]
Get a Summoned Wisp Stone from a Magician (its no rent) and an Essence Emerald from a Necromancer. Make sure you have an open general inventory slot since its a container you are going to be receiving.
In Akheva Ruins, head to where it says VT Key Quest on the map. You can likely invis half way, but may need to clear once you turn East from the large room due to undead and trap mobs. You can run through to trigger all the traps and then zone them off and they despawn. In the room with the altar, there is a stone structure on the left side that you can hide behind. It is 100% safe behind that to coth people to or camp at.
Once you are behind that, shrink if you can, you can then simply invis and hug the north wall (don't go up the stairs) and jump onto the altar. The undead infront shouldn't agro. Back onto the platform so that you are facing out towards the undead. In front of you should be four "Sacrificed Remains". The three nearest to you, you can easily kill with a low level nuke or other damage spell (1hp each). You should not aggro the mobs above if you are backed all the way into the corner. Its best to leave the fourth furthest up and not worry about killing that one. Its possible you'll aggro the mobs up top if you were to move closer to it when you need to hand in items.
Keep killing the three in front of you until "A shimmering presence" spawns (6 minute respawn, 10% chance for A shimmering presence). Hand the Shimmering Presence the Summoned Wisp Stone. It will spawn into "The Spirit of Akelha`Ra", a the typical Luclin ghost model. Hand her the Essence Emerald and you should have your Shadowed Scepter Frame in your inventory or on your cursor.
Completing the Key to Vex Thal[edit]
- Put all ten shards in the Shadow Scepter Frame and hit combine, results in the Unadorned Scepter of Shadows.
- Loot A Planes Rift after killing Emperor Ssraeshza (requires the Ring of Shissar key).
- Loot A Glowing Orb of Luclinite from any Luclin raid mob.
- Combine the Planes Rift and the Glowing Orb of Luclinite in the Unadorned Scepter of Shadows which results in The Scepter of Shadows.
Don't forget that Rumblecrush (small sized raid mob) guards the zone in typically. Also, like most keys, you need to hold it on your cursor in front of the zone in and hit the 'U' key to use it the first time and bind it to your keyring (/key).