Mac OSX 10.11 - Multiboxing Guide
This is a guide for one method of multiboxing on a Mac running OSX 10.11. This may also work with other versions of Mac OSX which also utilize Mission Control, instead of the older Spaces system to switch between active desktops.
This guide assumes you have already installed the EQ Client and Takplauncher AND created at least one character on each account you'll be using. Read through the Getting Started Guide on the Wiki for instructions on installing the client. The launcher can be found and downloaded, here: Takplauncher.
Before actually launching Everquest, it is necessary to do a little system configuration to ensure you have everything enabled and setup in Mac OSX 10.11 to support the functions needed to switch between multiple characters. For this method, this will mostly involve Mission Control and Keyboard Shortcuts.
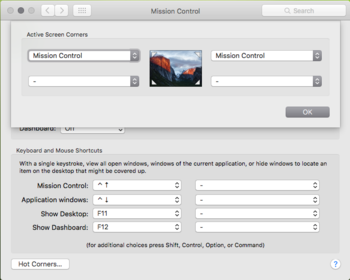
Using Hot Corners is a simple method of accessing Mission Control. To access Mission Control settings, go to 'System Preferences > Mission Control'. To configure Hot Corners, click the "Hot Corners..." button in Mission Control Settings. In the photo below, both top corners are setup to bring up Mission Control.
Once you have this setup, the next feature to configure are the keyboard shortcuts you'll use to switch between desktops in Mission Control. Below are two possible ways to set this part up, there are also others.
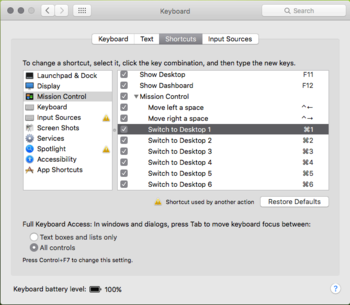
First, Mac OSX gives you the option to "Move left a space" or "Move right a space" between desktops in Mission Control using keyboard shortcuts (I believe the default when enabled are "⌃+←" or "⌃+→").
Second, you can also set actual keyboard shortcuts for each desktop in Mission Control. Below is one possible method.
To access the the settings for either of these keyboard shortcut options go to 'System Preferences > Keyboard > Shortcuts > Mission Control'.
Congratulations!! You should now be ready to actually launch Everquest.
Again, this guide focuses on Takplauncher, so the remaining steps in this guide may be specific to this launcher, or they may also work with other available launch methods.
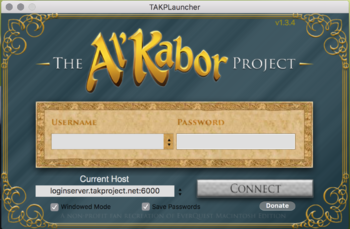
To get started, open Takplauncher on a desktop other than the ones you plan to use for your Everquest app windows.
On the launcher, make sure "Windowed Mode" is selected (unless you are creating a character for the first time, in which case it's easiest to launch once in Fullscreen to have mouse control for character creation).
Click "Connect" on the launcher and wait for the Everquest loading screen to appear. Once it appears, move your mouse to one of the Hot Corners you setup in the previous step, to open Mission Control.
While in Mission Control, use your mouse to select the Everquest app window and drag it to the Desktop you have chose for your first character.
When the Character Select screen finishes loading, you will need to use the Arrow & Enter Keys to select a character. (This is due to an issue with mouse control in the version of the EQ client, used on Takp which was not intended to allow Windowed Mode).
Once the character you have chosen loads into the world, type "/mc i" into chat and hit Enter. This will likely cause a popup that appears to give an error message, but simply hit Enter again to clear the popup and you should now have a correctly functioning mouse cursor in this Everquest window. You only need to complete this step once for each window -- not each time you switch between characters.
Once you have your first character up and running, simply rinse & repeat for your second and third (if applicable) characters .
Use the Mission Control keyboard shortcuts setup in the initial step to switch back to the Desktop with Takplauncher (or Cmd+Tab to switch to the Takplauncher app) and repeat the steps for launching another character. Be sure to place each instance of Everquest on it's own Desktop in Mission Control! If placed on the same desktop as another instance of Everquest one of the windows will hide behind the other and you will not be able to access the second window.
Once all windows are setup on the appropriate Desktops, simply switch between them using the Mission Control keyboard shortcuts, and the system should be ready to multibox.
Remember: Once the chosen character loads into the world, type "/mc i" into chat and hit Enter. It's easy to do this for the first character and then forget for the second and third. You must do this once for each instance of Everquest. Once you do it once in a window, you will retain mouse control in that window even in character select. (This is handy to know if you want to create a new character in Windowed Mode on an account that already has at least one character. Load an existing character, enter "/mc i", camp to Character Select and make the new character.)
If you are used to using Cmd+Tab to switch between apps, once in Everquest you can use this method to switch to apps other than Everquest, just remember, when you switch back to EQ, use your assigned keyboard shortcut to switch to the Desktop - Cmd+Tab does not work to switch back to EQ from other apps.


